Creating a reservie event with manually set Zoom invites
Introduction
reservie uses ‘events’ to represent all types of events that you organise. These can include, (although are not limited to) classes, courses, workshops and retreat. Traditionally the assumption has been made that all events will be organised and run with a physical presence in a physical venue. However, in reservie version 1.18.0.0, the concept of physical and virtual events are introduced.
Physical events - generally run from a physical venue such as a gym, studio or conference room. Customers attend physically at the event.
Virtual events - generally broadcast using video streaming technology. Customers attend the event virtually and require information to access the event such as an invite link, access ID and passcodes.
Virtual events and Zoom
reservie presents to ways in which to use Zoom meetings:
Automated mode - a reservie integration is enabled, which allows reservie to interact with Zoom and to automatically generate Zoom meetings.
Manual mode - no associated between reservie and Zoom. Invites are generated in your Zoom account and then manually submitted to reservie.
When the system is operating in Manual mode, the time at which are Zoom meeting are generated by you and so only a Manual scheduling mode is supported. In Manual mode - the administrator is responsible for defining the date and time for each date the event is scheduled.
Creating a virtual event with manually generated Zoom meetings
To create a virtual event with manually generated Zoom meetings please complete the following steps:
Step 1: Log in to your reservie account
To log into your reservie account click https://go.reservie.net/
Step 2 Access the events manager
Using the left-hand menu, click ‘Events > Course view’ or ‘Events > Daily view’ to access the events manager in either course view or daily view mode.
Step 3. Create an event
Once you have navigated to either Course view or Daily view, click the green ‘Add Event’ button to initiate the creation of an event and to enter the wizard.
Step 4: Create an event - select event type
Initially reservie requests detail of the type of event to be created. Select ‘virtual event’ to generate a virtual event.
Step 5: Create an event - setup basic event information
The ‘basic information’ section provides reservie with top level information regarding your event. This consist of:
Event name (mandatory) - the name of your event.
example: Yoga with tedEvent description (optional) - a description of your event.
example: Active Vinyasa flow class with Ted. Suitable for all levels.Activate waiting list (optional) - if enabled, when the event becomes fully booked, clients may join a waiting list.
Upon completing this information, click the ‘NEXT >’ button to proceed.
Step 6: Create an event - configure the virtual event
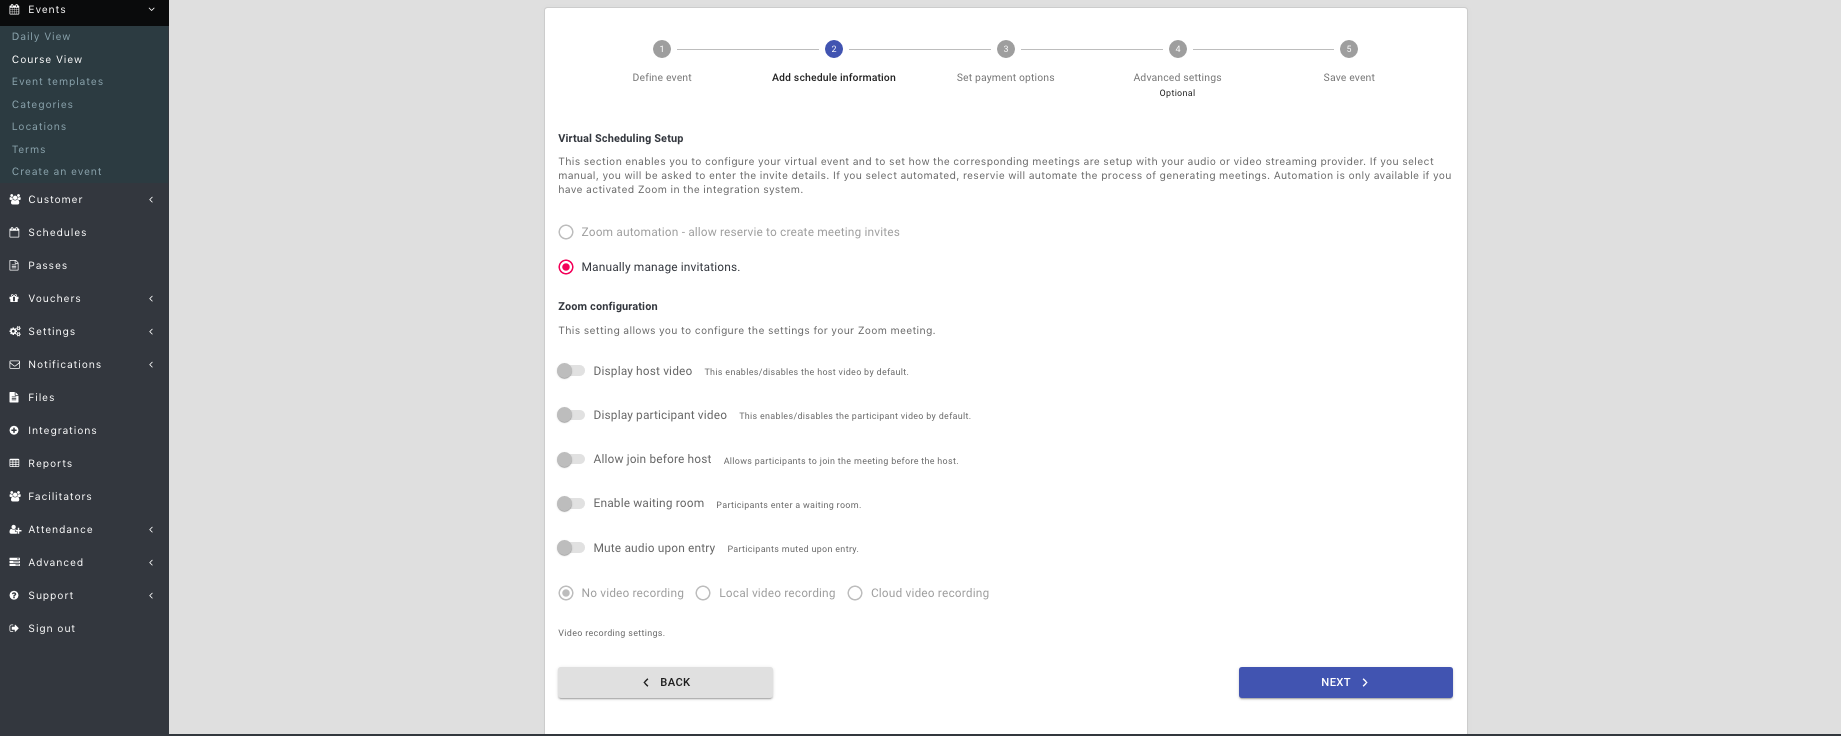
The ‘virtual event configuration’ section provides reservie with details of how you would like to manage the virtual event. This consists of two parts:
Virtual scheduling setup
Zoom automation - interacts with Zoom to auto-generate meetings.
Manually manage invitations - allows the administrator to generate invitations and add the information manually.
Zoom configuration - this is only available if Zoom automation is select in the ‘virtual scheduling setup’ section and allows the Zoom meeting to be configured.
To proceed with the setup, select ‘Manually manage invitations‘. The ‘virtual scheduling setup’ will be greyed out. Click the ‘NEXT >>’ button.
Step 7: Create an event - setup scheduling
The scheduling setup allows you to configure how scheduling will be managed. You can select one of the following:
Manual scheduling (see step 8a below) - the administrator is responsible for defining the date and time for each date the event is scheduled. Select this if dates and time vary.
Automatic weekly scheduling (see step 8b below) - the system will auto generate the event for the same time each week and auto generate the Zoom meeting. Select this if dates and times are consistent each week
Automatic monthly scheduling (see step 8c below) - the system will auto generate the event for the same time each month and auto generate the Zoom meeting. Select this if dates and times are consistent each month
Step 8: Manual scheduling
If you have selected manual scheduling, you are responsible for defining the dates and times of the events and you will be prompted to enter the following information:
Date(s) of the event (mandatory) - the date or dates on which the event will be held.
Time of the event (mandatory) - the time or times on which the event will be held.
Timezone of the event (mandatory) - the timezone of the event. The system will attempt to derive your timezone from your browser. However, if you are operating the event in an alternative timezone, please select the appropriate time zone.
Duration of the event (optional) - the duration of the event in minutes. For events that run over many days (for example a retreat), we recommend setting this to 0.
To add additional dates after closing the prompt, click the ‘+ ADD DATES’ button.
Upon closing the dates prompt, go to your Zoom account and create invites for each of the dates. Copy and paste the Invite link, the Invite ID and the Invite passcode into the boxes provided.
On final submission the system will start the auto-creation of dates.
Step 9: Define how the event dates should be booked
The booking type section enable you to define how event dates should be booked. You will need to select one of the following:
Individually - this allows clients to select individual dates to book. This is best for drop-in type classes
Blocks - this groups all available dates together and ensures that a client books all dates together. This is best for courses.
Selectable - This allows the clients to choose between 'Individually’ and ‘Blocks’
Step 10: Define the payment types support for the events
reservie supports the following payments types:
Credit / debit card - payments are processed by the credit card processors for the event dates purchased.
Passes - passes are pre-purchased credits which can later be redeemed against an event.
Credit / debit card and passes - this enables the customer to choose between credit / debit cards or passes.
Step 11a: Configure pricing options
Now you have configured in step 10, how the customer may pay, you must now define the pricing option. This requires the following parameters to be defined:
What is being sold - this assigns a name to the pricing option.
Yoga class example: 1 placeRetreat example: 1 person single ensuite bedroomPrice - the price in your default currency.
Example, if you currency is in GBP and the cost is £10.00: enter 10.00Spaces available - the number of spaces (stock) that you have for this pricing option.
Example: If you allow 10 people in your class, enter 10.
Note: It is recommended for standard classes that you only have one pricing option.
Once you have completed the setup on the pricing option(s), click the NEXT >> button.
Step 11b: Configure pricing options - pass payments only.
If you selected ‘Pass payments’ you must select the passes that the system is allowed to use during checkout
Note: You may select one or more passes. If you do not have any defined, these can be created in the passes section.
Step 12: Configure notifications
Notifications are email that are sent to customers upon certain conditions being detected. These include:
Event purchase - sent to the client when an event is purchased.
Event reminder - sent to the client 2 hours before the event commences.
Event cancellation - sent to the client if their space on an event is cancelled.
Waiting list - sent to the waiting list if a space becomes available on an event.
By default your standard ‘default’ notifications will be sent for each of the above. However, if you wish to override this feature you can either select a bespoke notification or disable the transmission of one or all of the notifications.
Step 13: Define event properties
Reservie allows you to associate a number of properties to your events. These include:
Facilitators - these are thirdparty providers which need to gain access to the event register.
Terms - these are additional terms which your clients must accept as condition of sale.
Categories - these are categories that can be assigned to the event.
Locations - this is the location of your event.
Step 14: Create the event
Click the ‘Save’ button to initiate the saving of the event. The following sequence will commence
Data validation - before the event is generated, the system will commence validation.
Event creation - once validated the event will be created.
Timing of Zoom meeting creation
Depending on your selected scheduling type the Zoom meetings will be created as follows:
Manual scheduling - if you selected the individual dates via the manual scheduling the Zoom meetings will be created immediately as part of the event generation.
Automated weekly scheduling - Zoom meeting will be created when the event dates are created by the reservie engine.
Automated monthly scheduling - Zoom meeting will be created when the event dates are created by the reservie engine.


