Setting up a pass
Introduction
Passes provide a flexible way to allow clients to pre-purchase credit which can later be redeemed against one or more events..
In order for a customer to be able to purchase a pass, it is first necessary to define a pass. This allows you to define a number properties, which include:
The price of the pass
The number of credits that are assigned to the pass which can later be redeemed against an event.
The number of days after purchase that a pass remains active and available for use.
Associated discounts to support promotional efforts.
This section article details how find your current passes, create, edit or delete passes. You can also access the link or HTML which can be embedded into your website, facebook page or email to facilitate the selling of passes.
Getting Started
Passes that you have previously defined can be found within the ‘passes’ section of reservie. To access your defined passes, create new passes, edit or delete passes it is necessary to access the passes manager as described below please:
Step 1: Click the ‘passes’ section from the left-hand menu
On the left-hand side of the reservie administration panel the menu system can be found. Click the ‘passes’ menu to access the passes manager.
Step 2: View current passes
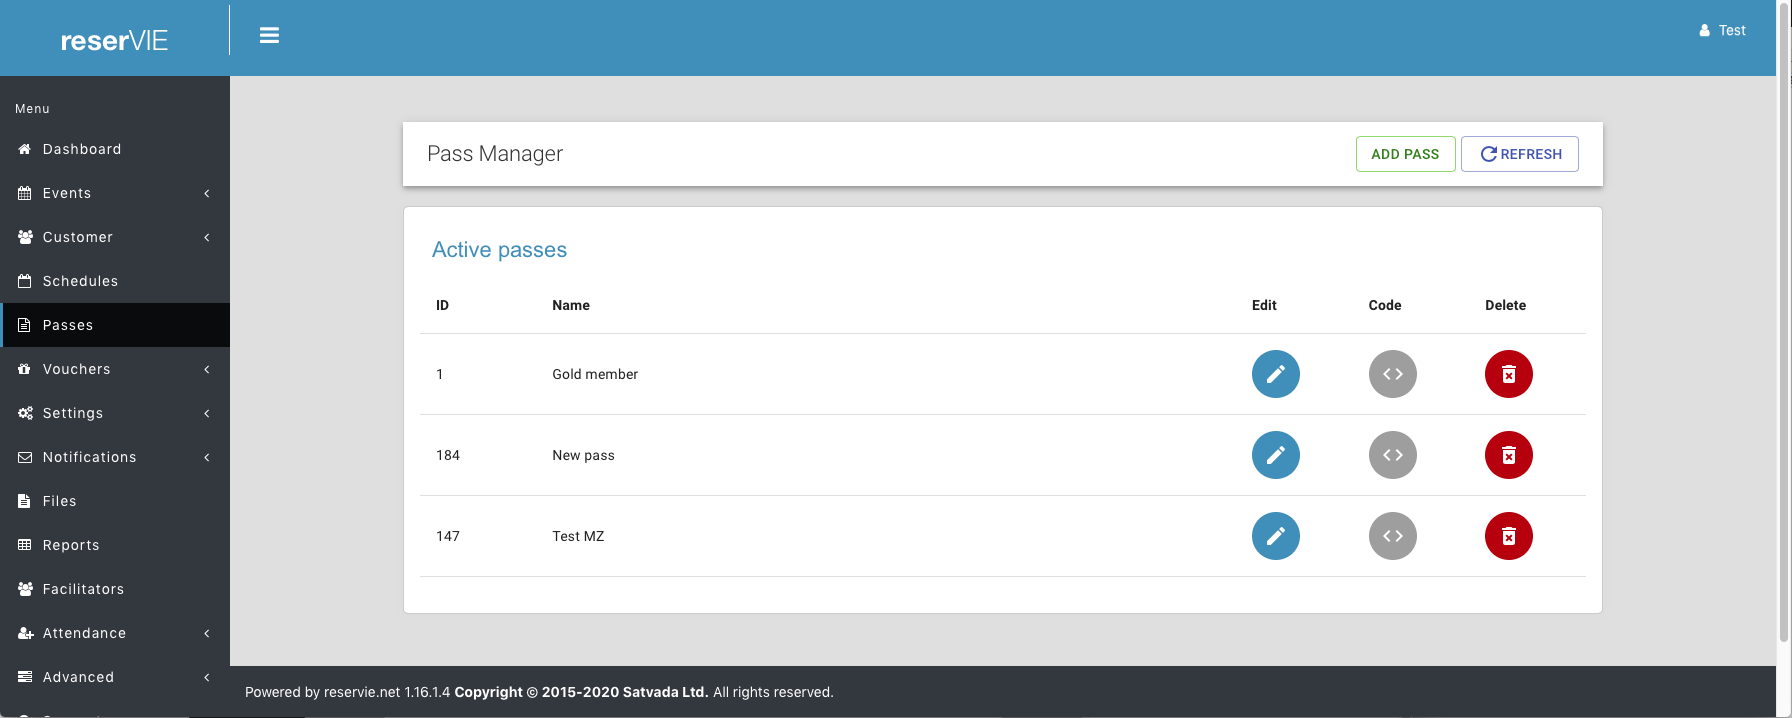
Upon clicking the ‘passes’ menu item, the system will automatically navigate to the ‘passes’ section as shown in the following example.
If no passes are listed this indicates that you have yet to define a pass.
Within the pass manager you will notice a number of buttons. These include:
1. Add pass
The add pass button enables you to create a pass. Upon clicking this button the pass editor will be initiated.
2. Edit pass
The edit pass button enables you to edit an exisitng pass. Upon clicking this button the pass editor will be initiated.
3. Pass widgets
Pass widgets allow you to access the sales page for the pass. Upon clicking the pass widget button you will be provided with various widget options which can be used in your website, emails, facebook or other forms of communication with your clients.
4. Delete pass
The delete pass button allows you to delete and remove passes that are no longer required. Upon clicking you will be asked to confirm before deletion is performed.
Creating a new pass.
To create a new pass, complete the following steps:
Step 1: Access the passes manager.
The first step to creating a new pass is to access the passes manager as described here
Step 2: Click the ‘Add pass’ button.
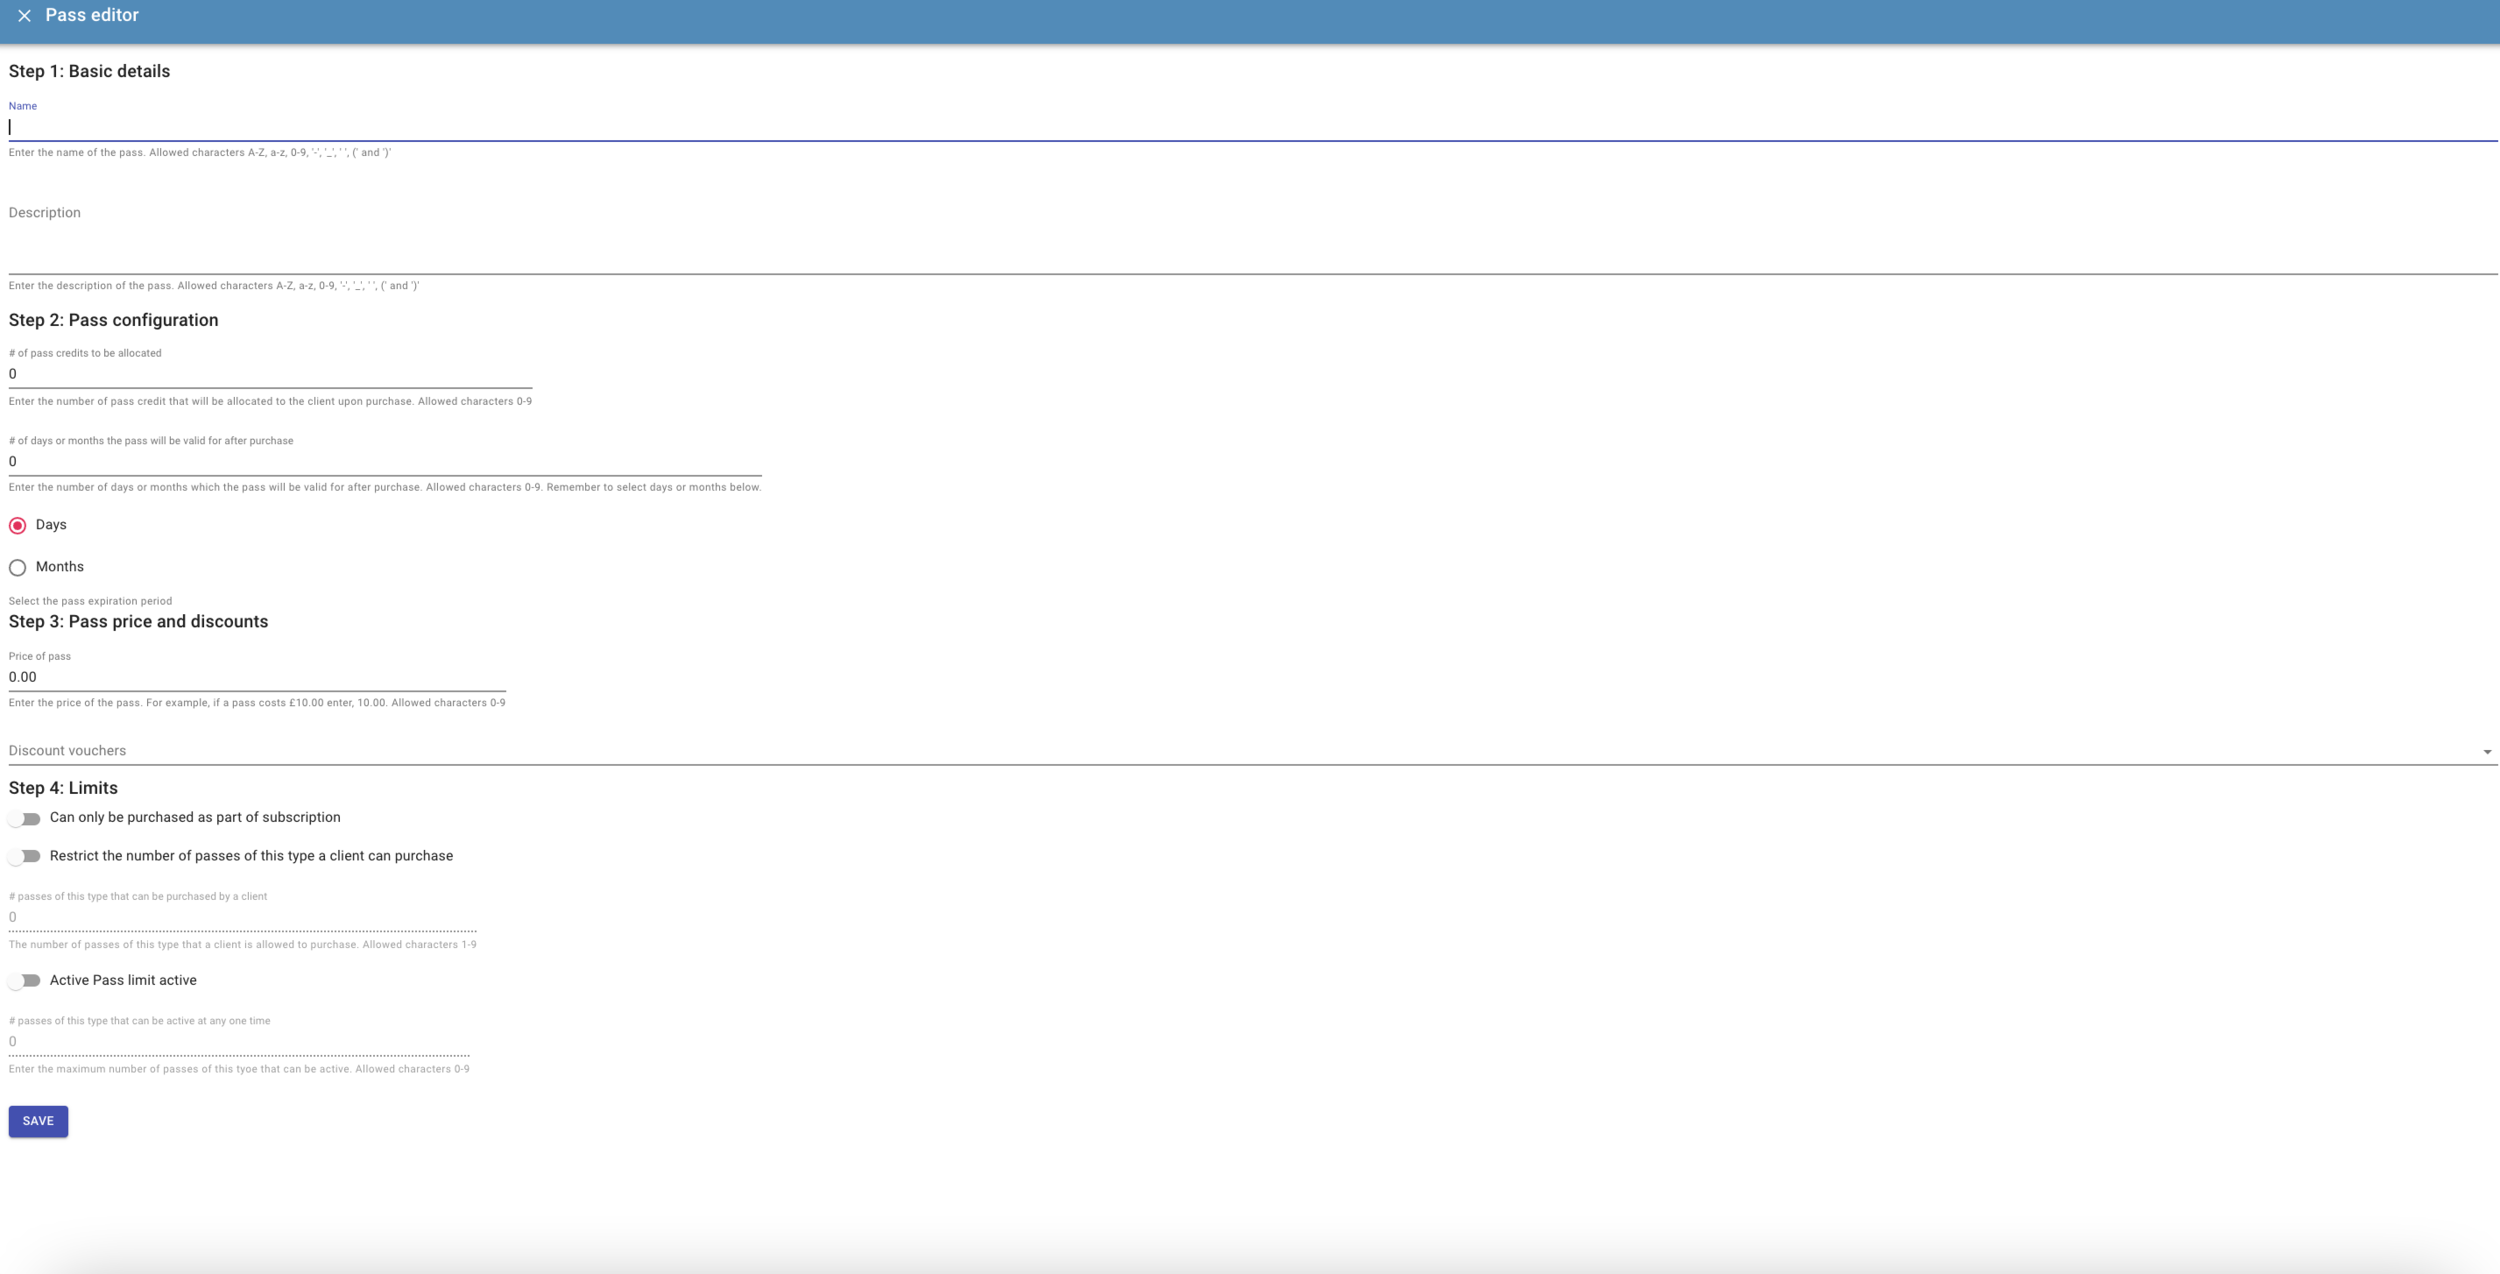
Upon clicking the ‘Add pass’ button, the editor will open
Within the passes editor you will see a number of fields which these need to be completed in order to fully define your passes, described as follows:
Step 1: Basic details
This section allows the basic configuration of the pass to be defined. It includes the following:
Name - this is the name of the pass. For example, if you were to offer a gold pass, a silver pass and a bronze pass, the name for the Gold pass might be “Gold pass".
Description - this tells you client more about the pass they are buying. For example in for a “Gold pass” you might include a description such as “The Gold pass allows you to access all of our classes and workshops each month”
Step 2: Pass configuration
This section allows you configure the pass. This includes the following:
Number of credits that the pass has which can later be redeemed against an event
Valid period - the time or duration after purchase which a pass remains active. After pass has expired the any remaining credits will not be useable. Further more, a client will be prevented from booking an event which has a date after the expiration of their pass.
Months or days - the period associated to the 'valid period’
Pass starts - the system supports two modes.
Standard - the pass starts from the date/time it is purchased.
Advanced - the pass starts in line with the event purchased*
Important: The advanced pass reverts to standard in the following scenarios:
The pass is purchased using the legacy pass purchase page. i.e., it has not been purchased uing version 4+ scheddule.
The first booking using the pass is a media file
The pass is purchased using a subscription.
It has been manually assigned via an administrator.
Step 3: Pass price and discounts
This section allows you configure price and associated discounts for the pass. This includes the following:
Initial price - the price charged on very first transaction
Price - this is the gross price that the customer should pay for all but the initial
Discounts - a list of vouchers that may be used with the pass. This is typically used for promotional activities.
Note: The gross price or the resultant price after a discount has been applied must be greater than or equal to £1, $1 or 1 Euro (depending upon your currency) since the payment process requires this as a minimum amount to process. As such it is not possible to have free passes.
Step 4: limits
Can only be purchases as part of a subscription - if enabled, this pass cannot be purchased outside of a subscription
Restrict the number of passes of this type a client can purchase - if enabled, allows the number of passes of this type that can be purchased by a client to be restricted. Please note this is a schedule version 4+ feature.
Active pass limits - This section offers you an advanced feature to limit the number of active passes. It is typically recommended that this feature is disabled unless you have concerns that pass availability might outstrip available space that you have in your events.
Editing a pass
To edit a pass, complete the following steps:
Step 1: Access the passes manager
The first step to creating a new pass is to access the passes manager as described here
Step 2: Click the ‘Edit pass’ button
Upon clicking the ‘edit pass’ button, the editor will open.
You can now edit the configuration of your pass. You will note that all fields are the same as when you originally created the pass. For further details on these fields, see the ‘Creating a new pass’ section above.
Deleting a pass
To delete a pass, complete the following steps:
Step 1: Access the passes manager
The first step to creating a new pass is to access the passes manager as described here
Step 2: Click the ‘delete pass’ button
Upon clicking the ‘delete pass’ button, you will be asked to confirm the deletion. Upon clicking ‘OK’, you pass will be deleted an no longer available for purchase.
Adding a pass to your website
Important: This is not necessary if you use v4.x schedules. The schedule will actively manage which passes can be purchased based on the customer’s event selection.
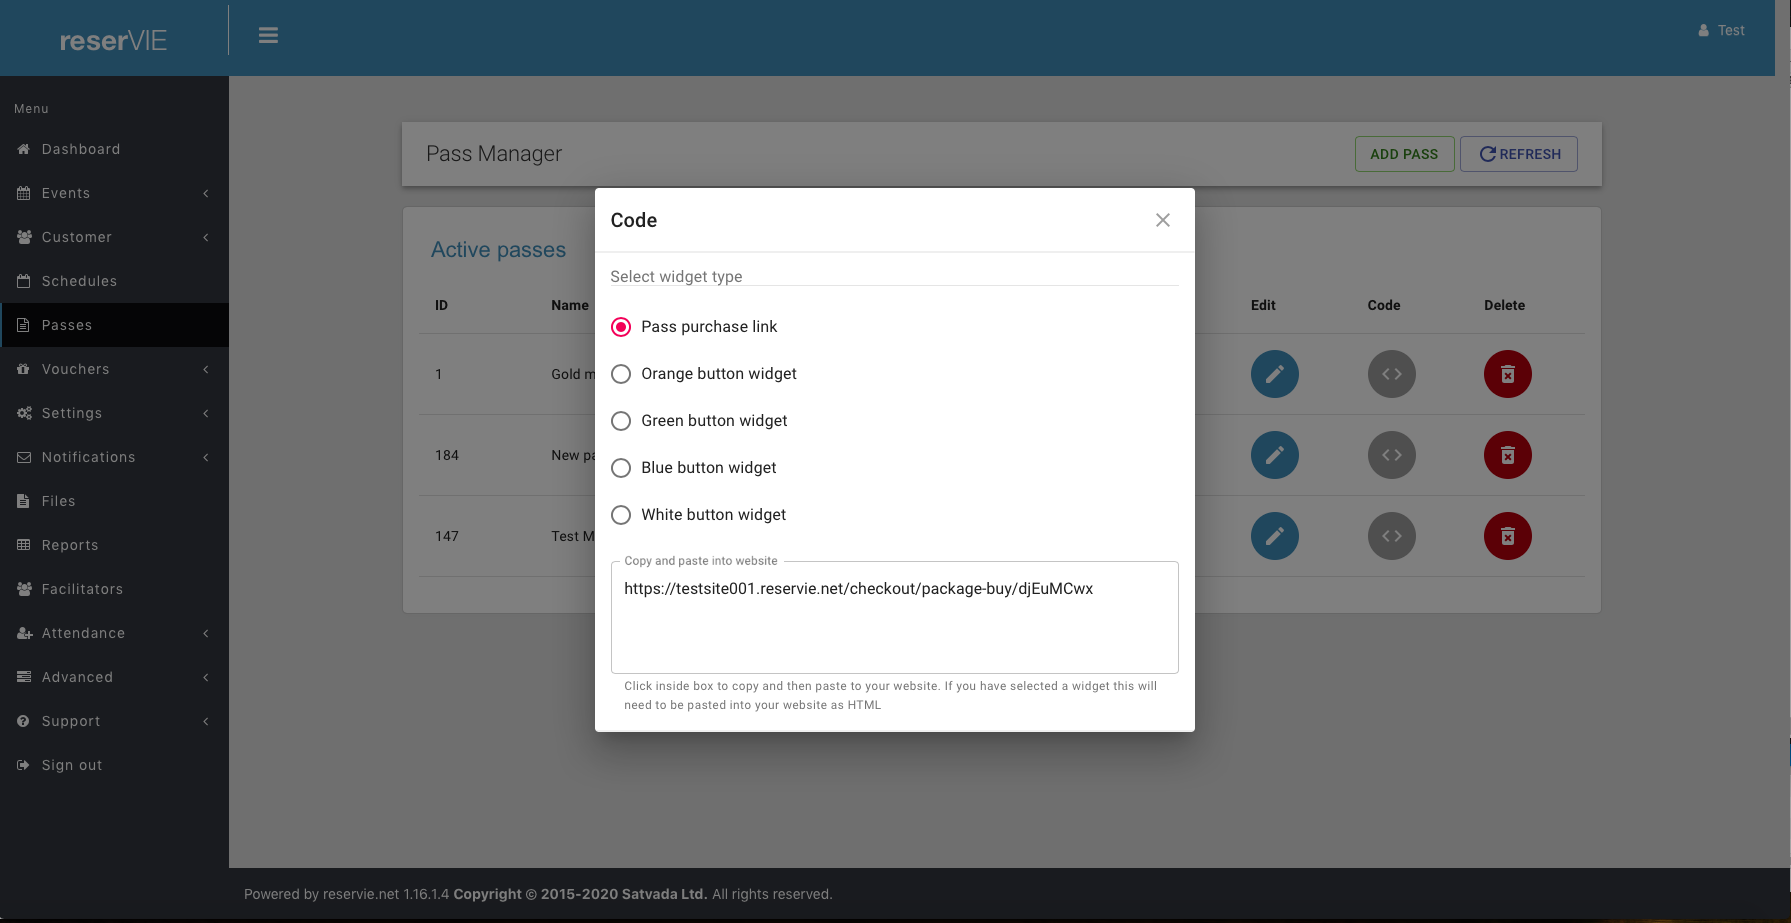
Once you have created a pass, it can be inserted into your website, facebook page or emails. To link to your pass purchase page, reservie provides a number of widgets. These include:
HTML buttons in various colours - these are fully configured buttons that can be embedded into your website. Please note, you will need to embed these as HTML or ‘code’
Link - many website editors provide was of generating buttons which match the style of the website. If you are using these or wish to link to the purchase page you can access the ‘pass purchase link’ - this is the raw address that can be pasted into any browser and is the link that website editors, facebook and email clients require.
To get the pass widget of your choice:
Step 1: Access the passes manager
The first step to creating a new pass is to access the passes manager as described here
Step 2: Click the ‘code’ button
Upon clicking the ‘delete pass’ button, a pop-up will be displayed. Select from the list the widget that is most suitable for your needs. The box will be populated and can be copied ready for pasting into your website, facebook page or email client.


